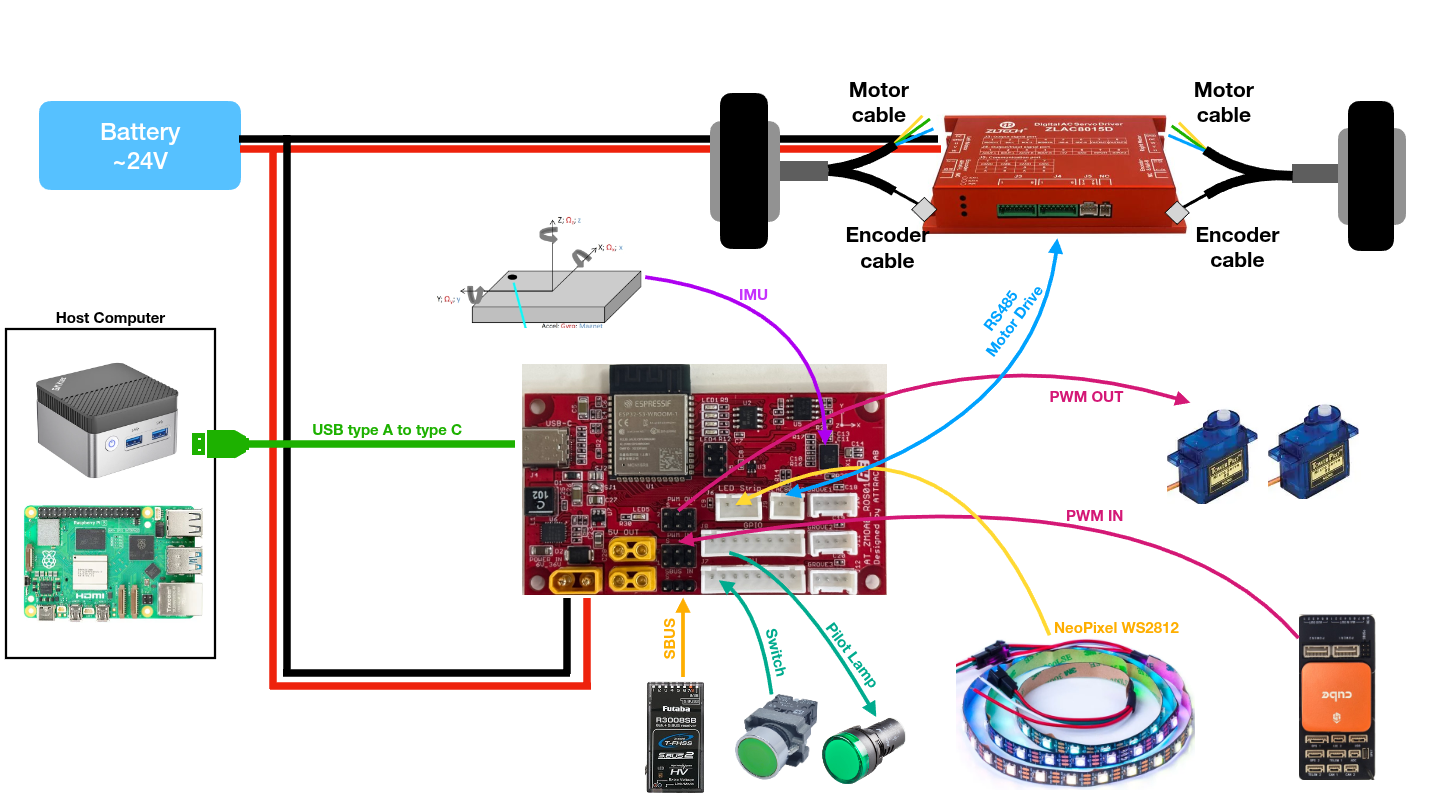
AT_ZMOAB_ROS board
This board is an ESP32 micro-ros board to interface with peripheral devices such as
SBUS radio receiver
PWM servo
Switch or push button
LED pilot lamp
ZLAC8015D motor driver
9 axes orinetation sensor BNO055
NeoPixel WS2812
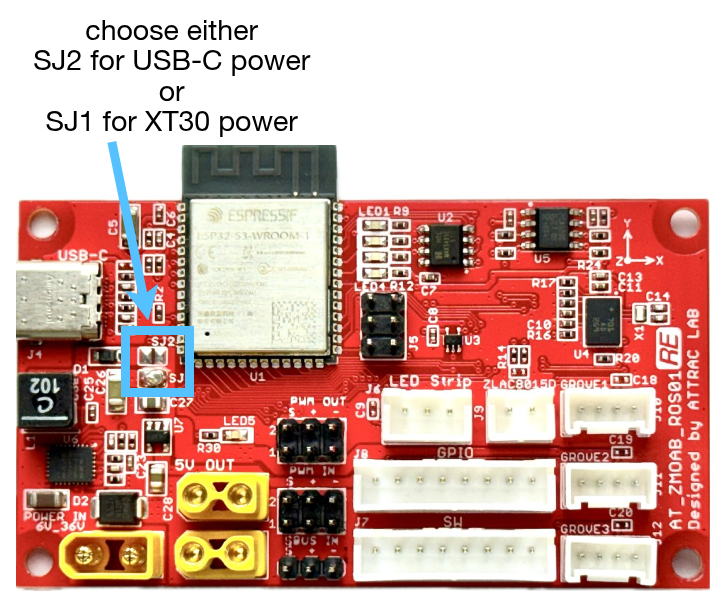
Power Selection
To power the board, there are two options,
From USB-C port (from computer)
From XT30 port
You will need to solder the pad SJ2 (for USB-C) or SJ1 (for XT30) to select which power source we’re going to use. Most of the time we need to use this board with motor driver, so it’s recommended to power from XT30 port.
Software setup
This project is built on PlatformIO on vscode, please install it in advance.
Then clone the project Gihub repository to your project workspace.
On vscode PIO Home, click on Open Porject and navigate to the project directory.

On host computer (your PC), we need to install micro ROS agent, please create separate workspace , and build micro-ros-agent. This package will allow us to get/set data from micro-ros from ESP32.
There is an utility package zmoab_uros_utils to work with AT_ZMOAB_ROS board, so we can develop the robot project easier. Please create the workspace and build this package.
Minimal hardware setup
This is minimal setup to drive motor from ZLAC8015D. Please check the following diagram.
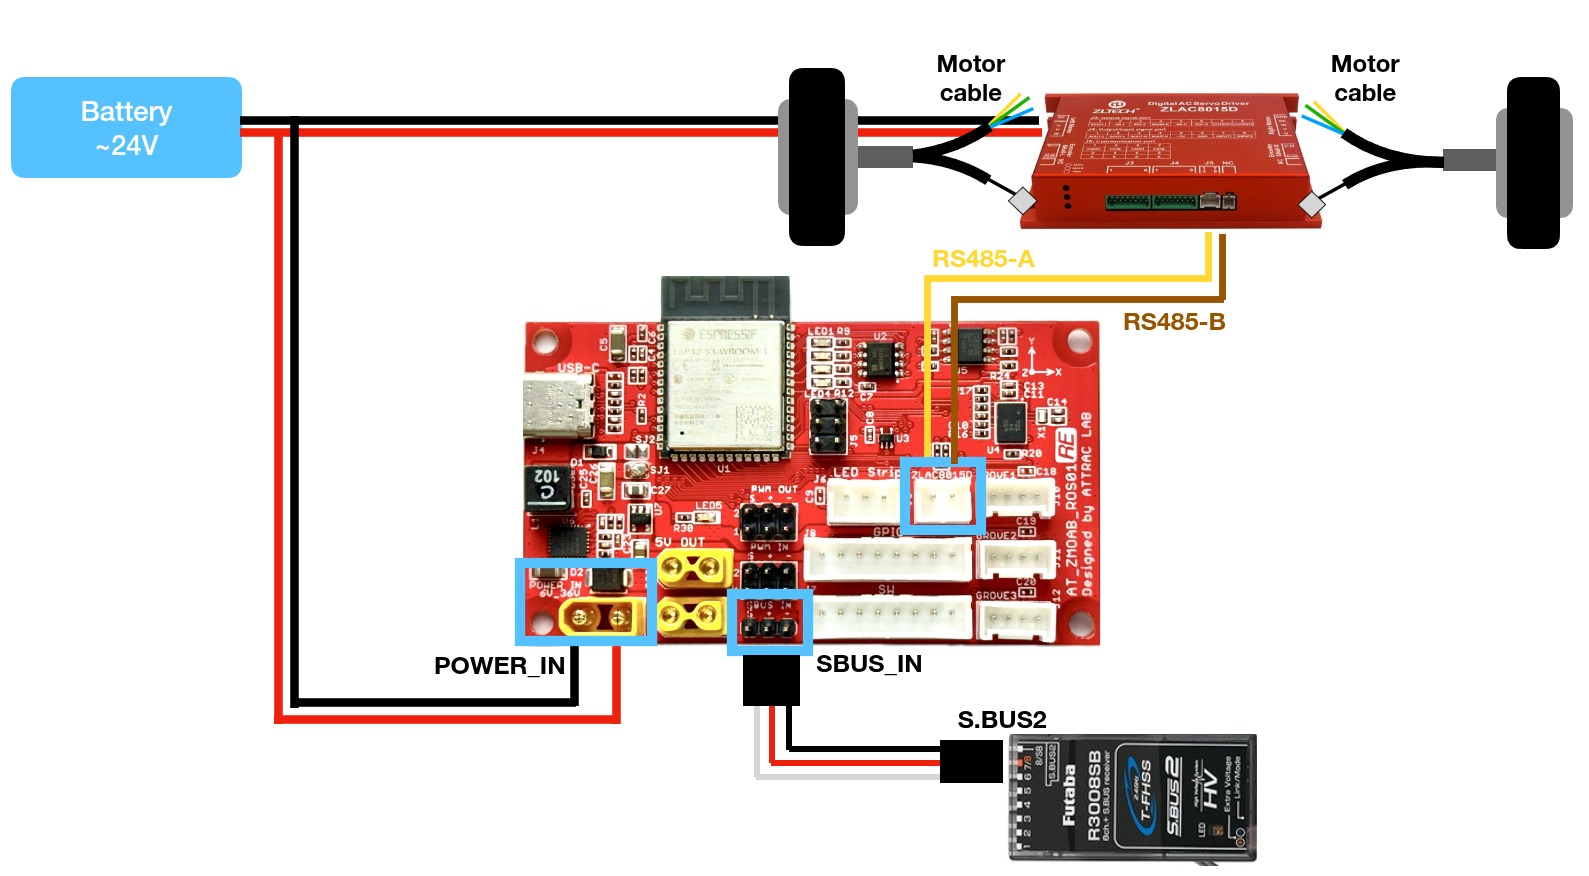
Please make sure to lift up the motor from ground first for safety reason.
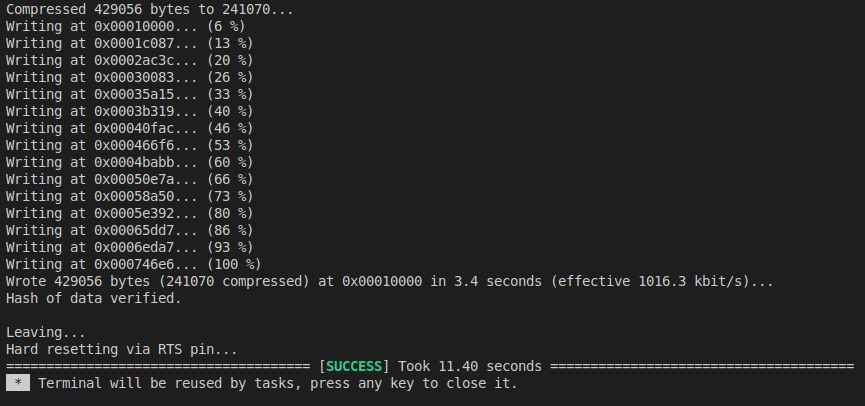
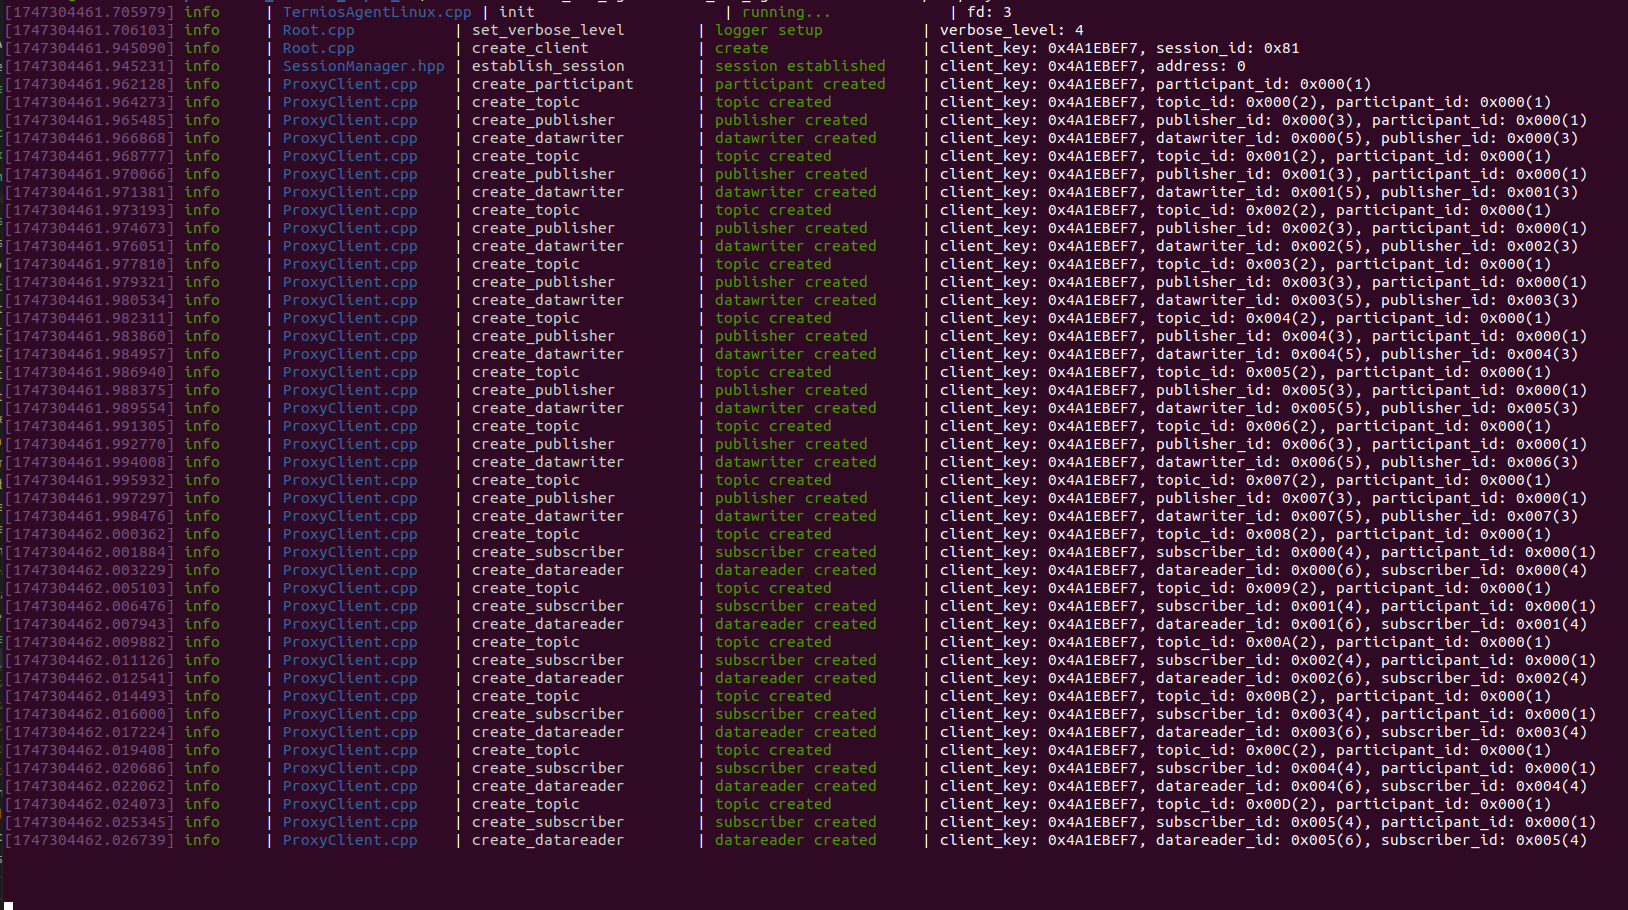
Power on the board, then connect USB-C to computer, and on the lower tab menu click on Upload to start writing the program to ESP32. If the program is written successfully, you will see the following message.
Note
If the writting process is failed, please short the pin as following image and power up again.
This will make the board boot up in Upload Mode. After writting program in this state, you will need to disconnect the pins and restart board again.

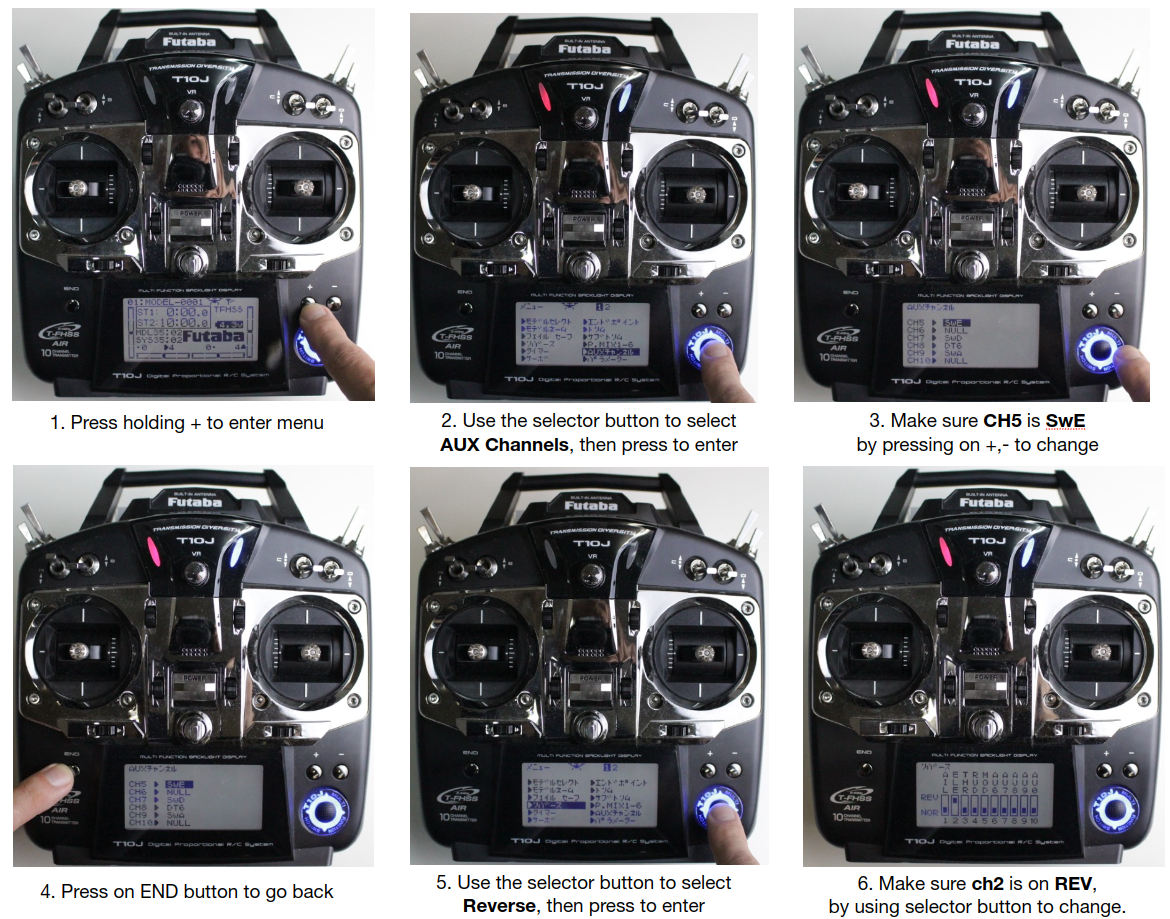
On radio transmittter Futaba, we need to assign the channel and switch as following.
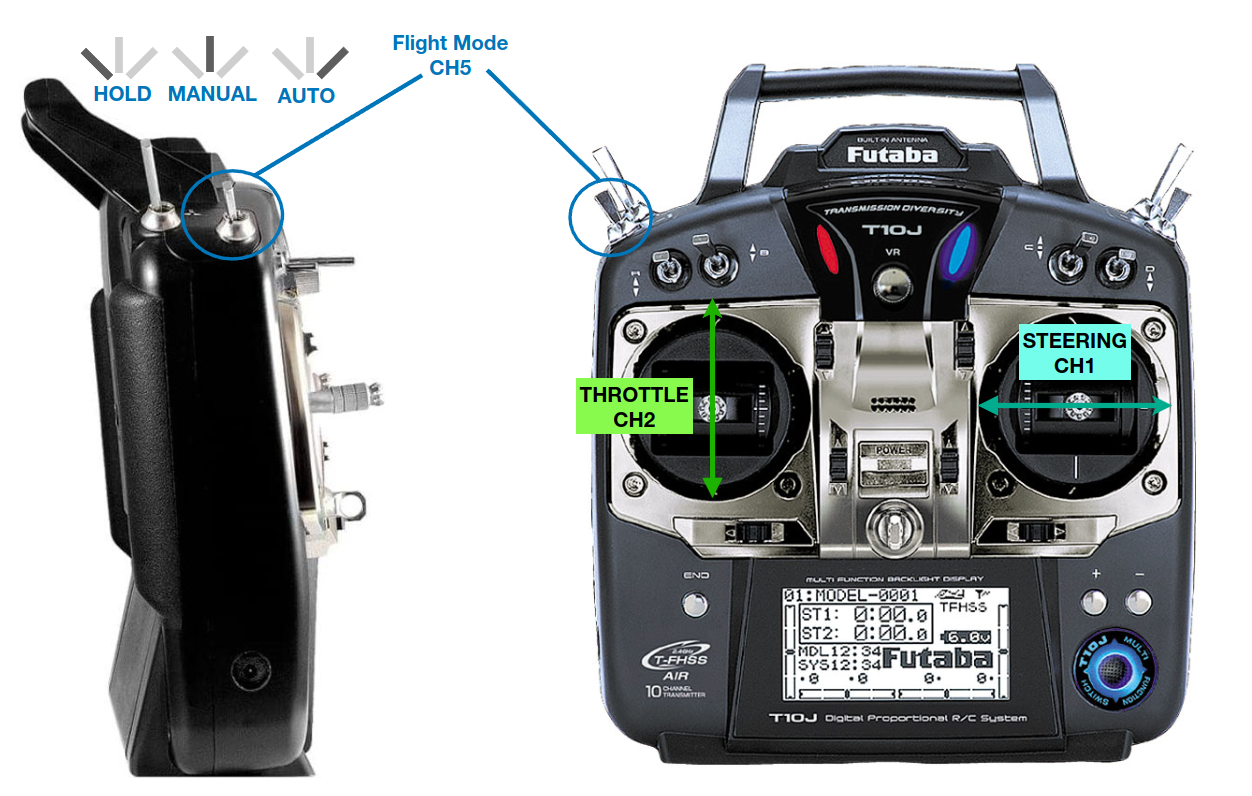
Try switching flight mode CH5 forward-backward and stay at middle (MANUAL mode), then try slowly moving the CH2 stick up-down to drive the motors and CH1 stick left-right for steering.
Warning
Please becareful to move the stick SLOWLY and lift up the wheels from ground.
The wheel rotation speed is varied propotionally increasing with stick position.
Test Run
After setup both software and hardware, then connect USB-C from AT_ZMOAB_ROS board to computer.
## Terminal 1
## source micro-ros-agent ws environtment
## assume it is ~/uros_ws
source ~/uros_ws/install/local_setup.bash

## start micro-ros-agent
ros2 run micro_ros_agent micro_ros_agent serial --dev /dev/ttyACM0
## you will need to select the correct /dev/tty* device
The terminal 1 will be showing following for success connection established,
ROS topics
All of the ROS topic from AT_ZMOAB_ROS is just std_msgs, and sensor_msgs. There is no special custom message here.
/zmoab/cart_mode : this will show the flight mode according to radio transmitter CH5, 0 is HOLD (no movement), 1 is MANUAL (RC control), 2 is AUTO (or ROS control). If radio transmitter is power off, the mode will be 2 automatically.
Message Type
std_msgs/msg/Int8
Msg Interval
continuous
/zmoab/cart_mode_cmd : this is to change the flight mode by ROS topic, and it will reflect to /zmoab/cart_mode as well. User just need to publish one time.
Message Type
std_msgs/msg/Int8
Msg Interval
once
/zmoab/disable_motor : publish this as True will release the motor power, like release brake.
Message Type
std_msgs/msg/Bool
Msg Interval
once
/zmoab/encoder : this is raw counting value from encoder 1 turn is 16384 count (14 bits).
Message Type
std_msgs/msg/Int32MultiArray
Value
[left wheel count, right wheel count]
Msg Interval
continuous
/zmoab/error : this is an error code from ZLAC8015D motor driver.
Message Type
std_msgs/msg/Int16MultiArray
Msg Interval
continuous
/zmoab/imu : IMU data from BNO055.
Message Type
sensor_msgs/msg/Imu
Value
standard IMU data
Msg Interval
continuous
/zmoab/imu_reset : in case we want to restart the IMU back to all zero, we can publish as True.
Message Type
std_msgs/msg/Bool
Value
True for reset data
Msg Interval
once
/zmoab/led_state : this is to control LED stripe light from NeoPixel WS2812.
Message Type
std_msgs/msg/Int8
Msg Interval
once
/zmoab/pwm_in : this is to receive PWM input (microseconds) to the board, for example you can connect this port to device that generate PWM signal like Cubepilot or Radio receiver, so user can see this topic PWM data by subscription.
Message Type
std_msgs/msg/Int16MultiArray
Msg Interval
once
/zmoab/rpm_cmd : user program can publish to this topic to control motors RPM.
Message Type
std_msgs/msg/Int16MultiArray
Msg Interval
continuous
/zmoab/rpm_fb : user program can subscribe on this topic to see present RPM feedback, it could be used to compute wheel’s odometry.
Message Type
std_msgs/msg/Int16MultiArray
Msg Interval
continuous
/zmoab/sbus_rc_ch : you can get data of all SBUS channel and use it for something else like trigger switch or use signal to do some tasks.
Message Type
std_msgs/msg/UInt16MultiArray
Msg Interval
continuous
/zmoab/servo_cmd : you can drive PWM servo from PWM_OUT port by publishing to this topic in microseconds value.
Message Type
std_msgs/msg/Int16MultiArray
Msg Interval
once
/zmoab/switch : if you have a switch connecting on the board, like push button, emergency stop button, or kill switch. You can read the state of switch by subscription on this topic.
Message Type
std_msgs/msg/Int8MultiArray
Msg Interval
continuous
Wheels Odometry
With the feedback of wheel’s speed, we can calculate the odometry. From the minimal setup for motor drive, we will continue from that.
We are going to use the most well-known package robot_localization to do sensor fusion of wheels odometry and IMU data. Then make sure to install this.
## if ROS2 is installed by apt debian, then use this command
sudo apt install ros-$ROS_DISTRO-robot-localization

## if ROS2 is built from source, then clone this package to workspace
cd ~/dev_ws/src
git clone https://github.com/cra-ros-pkg/robot_localization.git
cd ~/dev_ws/src/robot_localization
## make sure to change <your-ros-distro> to correct one on your system
git checkout <your-ros-distro>-devel
cd ~/dev_ws
rosdep install --from-paths src --ignore-src -r -y
colcon build --symlink-install --packages-select robot_localization
Run the node,
## Terminal 1
## source micro-ros-agent ws environtment
## assume it is ~/uros_ws
source ~/uros_ws/install/local_setup.bash

## start micro-ros-agent
ros2 run micro_ros_agent micro_ros_agent serial --dev /dev/ttyACM0
## you will need to select the correct /dev/tty* device

## Terminal 2
## source ros env and workspace of zmoab_uros_utils package
## assume it is ~/dev_ws
source ~/dev_ws/install/local_setup.bash

## start node with show_log as True and left-right wheel separate distance as 0.36 m
ros2 launch zmoab_uros_utils vel_odom_converter.launch.py show_log:=True wheel_sep:=0.36

## from ros2 topic list, we could see /zmoab/odom and /zmoab/imu_with_time
## we are going to use this with robot_localization.
## you could check the config file on ~/dev_ws/src/zmoab_uros_utils/config/ekf.yaml

## Terminal 3
## source ros env and workspace of robot_localization package
## assume it is ~/dev_ws
source ~/dev_ws/install/local_setup.bash

## start robot_localization node
ros2 launch zmoab_uros_utils odom_ekf.launch.py

## from ros2 topic list, we could see /odometry/filtered which is fused odometry

## Terminal 4
## soure ros2 env, and start rviz2
rviz2 -d ~/dev_ws/src/zmoab_uros_utils/rviz/odometry.rviz
The blue arrow is the fused odometry and red arrow is raw wheel odometry, and put the cart on ground and try driving around by radio transmitter in RC manual mode. After moving the cart for a while, you could see that the raw wheel odometry /zmoab/odom will keep drifting away because of wheel slippery. But the fused odometry /odometry/filtered will remain closely to correct position.

From this wheels odometry, we can apply this further to Navigation2 to make autonomous driving robot.
Drive PWM Servo
There is PWM_OUT port which we can use to drive PWM servo. For small 5V servo, you can connect with middle 5V pin directly but if the servo requires more than 5V, then the external battery is needed. Please check on the connection diagram.
## Terminal 1
## source micro-ros-agent ws environtment
## assume it is ~/uros_ws
source ~/uros_ws/install/local_setup.bash

## start micro-ros-agent
ros2 run micro_ros_agent micro_ros_agent serial --dev /dev/ttyACM0
## you will need to select the correct /dev/tty* device

## Terminal 2
## source ros env, and publish /zmoab/servo_cmd
## this will set servo 1 to move to fully end, and servo 2 at middle
ros2 topic pub --once /zmoab/servo_cmd std_msgs/msg/Int16MultiArray "data: [2000, 1500]"

## this will set servo 1 to move to middle, and servo 2 to fully start end.
ros2 topic pub --once /zmoab/servo_cmd std_msgs/msg/Int16MultiArray "data: [1500, 1000]"
Receive PWM In
There is PWM_IN port which we can use to receive PWM signal, for example from Cubepilot or from radio receiver.
Similar to Drive PWM Servo, we need to run micro_ros_agent and just listen on /zmoab/pwm_in, the value range is between 1000 to 2000 microseconds.
SBUS Radio Receiver
As we have tried connecting SBUS port with radio receiver S.BUS before. So we can listen on /zmoab/sbus_rc_ch which is the SBUS value. Stick value is in the range of 368 to 1680 and middle is 1024. For switch value, the range is 144, 1024, and 1904 as three stages switch.
Switch and Push Button
If there is switch or push button that you want to monitor the state, we can listen on /zmoab/switch. All the pins is setup as INPUT_PULLUP, so you can connect to switch directly without extra resistor.
LED Strip NeoPixel WS2812B
There is a port LED Strip where you can connect with NeoPixel WS2812B. This could be used as status light for the robot in certain state.
## Terminal 1
## source micro-ros-agent ws environtment
## assume it is ~/uros_ws
source ~/uros_ws/install/local_setup.bash

## start micro-ros-agent
ros2 run micro_ros_agent micro_ros_agent serial --dev /dev/ttyACM0
## you will need to select the correct /dev/tty* device

## Terminal 2
## source ros env, and publish /zmoab/led_state
## set solid red
ros2 topic pub --once /zmoab/led_state std_msgs/msg/Int8 "data: 1"

## set solid green
ros2 topic pub --once /zmoab/led_state std_msgs/msg/Int8 "data: 2"

## set blink blue
ros2 topic pub --once /zmoab/led_state std_msgs/msg/Int8 "data: 13"

## set moving green
ros2 topic pub --once /zmoab/led_state std_msgs/msg/Int8 "data: 32"
For more detail of color, please check on above ROS Topics definition.